Battle of Killiecrankie
July 27, 1689
1689 Scottish Jacobite rising
The Battle of Killiecrankie (Scottish Gaelic: Blàr Choille Chnagaidh), also referred to as the Battle of Rinrory, took place on 27 July 1689 during the 1689 Scottish Jacobite rising. A Jacobite force under John Graham, Viscount Dundee, defeated a government army commanded by Hugh Mackay.
Williamite War
James VII went into exile in December 1688 after being deposed by the Glorious Revolution in Scotland. In March 1689, he began the Williamite War in Ireland, with a simultaneous revolt led by Dundee, previously military commander in Scotland.
Heavy Losses
Hampered by lack of men and resources, Dundee gambled on a decisive battle which he hoped would attract wider support. Although Killiecrankie was an unexpected and stunning victory, his army suffered heavy casualties and he was killed in the final minutes.
It did little to change the overall strategic position, and the Jacobites were unable to take advantage of their success.
Later, as a general in the Scottish army, Claverhouse remained loyal to King James VII of Scotland after the Revolution of 1688. He rallied those Highland clans loyal to the Jacobite cause and, although he lost his life in the battle, led them to victory at Killiecrankie.
Bonnie Dundee
This first Jacobite rising was unsuccessful, but Claverhouse became a Jacobite hero, acquiring his second soubriquet “Bonnie Dundee”.
The Battle - 27 July, 1689
On the morning of 27 July, Dundee learned Mackay’s forces were entering the Pass of Killiecrankie, a track nearly 3 kilometres (1.9 mi) long with the River Garry on the left and steep hills on either side.
Sir Alexander McLean and 400 men were sent to skirmish with the advance guard, while Dundee assembled the rest of his troops on the lower slopes of Creag Eallich, north of the pass. As they advanced into the pass, the government army had the Jacobites on the high ground above and the river behind, while the narrow track made advance or retreat equally hazardous.
Mackay halted, moved off the track and deployed his troops facing uphill in a long line only three men deep to maximize firepower.
Scots Brigade
Mackay’s force included Balfour, Ramsay and Mackay’s regiments of the Scots Brigade, along with the newly raised regiments of Kenmure and Leven, part of Hastings’ regiment, and 100 cavalry. As the most experienced, the Scots Brigade under Balfour and Lauder was placed on the left, which provided the best field of fire.
Jacobites
The Jacobites formed into columns and were in position by late afternoon but Dundee waited until sunset, just after 8:00 pm to begin his attack.
Balfour’s front line fired three volleys, killing nearly 600 Highlanders but their fire was partly masked by a shallow terrace on the hillside, while the regiments to their right apparently fled without firing a shot.
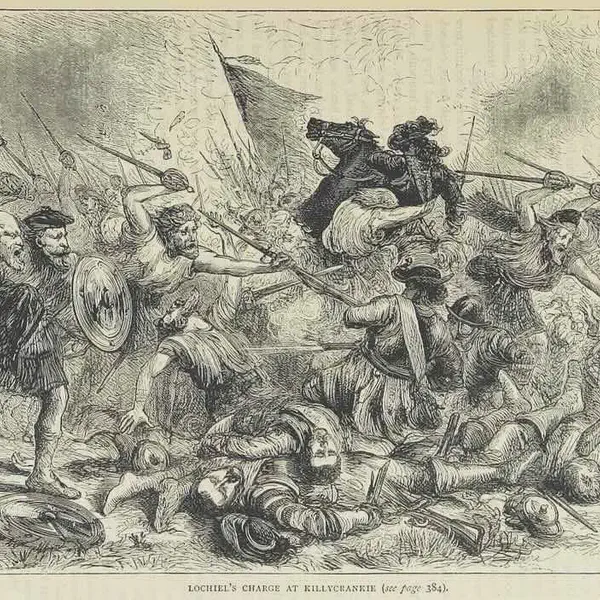
Following their usual tactics, the Highlanders fired a single volley at 50 metres, dropped their muskets, and using axes and swords crashed into Mackay’s centre.
1st use of the Plug Bayonet
Killiecrankie is the first recorded use by British troops of the plug bayonet, which increased firepower by eliminating pikemen.
It was ‘plugged’ into the musket barrel, preventing further reloading or firing, so fixing them was delayed until the last possible moment.
Inexperience in their use and the speed of the Highland charge left the government troops defenseless and many fled, abandoning Balfour, who was killed along with James Mackay, Hugh’s younger brother
Aftermath
Mackay managed to reform Hastings and Leven’s regiments from the centre and right; some 800 men made it back to Stirling with relative ease, while others straggled in over the next few days. The Highlanders halted their pursuit to loot the baggage train, and their own casualties were enormous, with between 600 and 800 wounded or killed, the vast majority on the government left.
Dundee was fatally wounded towards the end of the battle, and died shortly afterwards; a letter sent under his name to James reporting the victory is generally thought to be a forgery, although it provides a useful summary of the action
2,000 Killed
Based on muster rolls before and after the battle, government losses were around 2,000 killed, wounded or missing, although some of the “missing” may well have deserted. As colonels were paid for the number of men in their regiment, there was an obvious temptation to over-report pre-battle figures, but it is possible they suffered losses of up to 50%